FINNISHED! / DIY inspiration
Fall Time Inspiration
The fall is unfortunately soon again here and that means autumn colors and shapes also in RokRokInc. jewelries. Here are my newest pieces of the autumn collection and the instructions how to make them. Check out also all the RokRokInc. fall pieces in the Shop/AUTUMN collection!

For leather leaves you need: recycled leather, jewelry findings, pliers, chain,
clothing paint, paint brush, pencil, (glue), scissors, iron, thin cloth and a thick needle.
HOW TO MAKE LEATHER LEAF JEWELRIES
- Pick some leaves and put them between a book to dry. Give them a good week time to really get dry.
- Choose you recycled leather. If it's too thin, glue two pieces from the back side together.
- Draw your leaf to the leather (back side) and cut it.
- Spread your paint on the leaf and press it gently on the cut leather. Let it dry.
(Back side of the leaf usually gives a better print.) - Iron the paint side through a thin cloth. (This makes the paint last.)
- Make holes to the leather with a thick needle. Modify the leather leaf as you wish.


Hoarding...
I am the kind of person who has a big big trouble throwing anything away. A bit like my granny: I just think you can use everything somehow again in some point in the future and in ways that you don't know yet. I know, sometimes it goes to far... But this time for example I found an old mini skirt that I can't use anymore. (Don't ask why...) So, tadaa! This is what I got out of it: Zipper Earrings by RokRokInc.
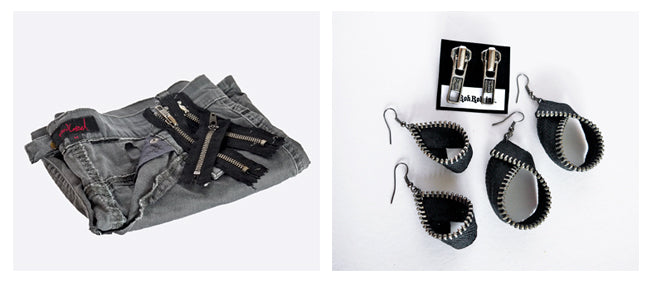 All in all three different pairs of earrings from one mini skirt.
Hoarding reminds me about this crazy haunted house "flea market" in Helsinki. In the area called Linnunlaulu is an old house where lives an old man who used to run there a people's commune in the 60's. Now he lives there alone and he has filled the once beautiful and still prestige building with stuff literally from the floor to the ceiling. You can hardly even walk along the thin path between all the crap, and for sure not without getting claustrophobic. I have never seen anything like that!
So, this man runs there a flea market on weekends, though nobody dares to go in. I did it once and I learned that the owner comes from the same city as me. He even remembered my grandfather. And by the way he himself assured the house is truly haunted. But if you ever happen to walk around the Töölönlahti and happen to see a small sign saying "Kirpputori", I recommend you should visit there just for the experience. It is scary.

From the chain I bought from this haunted house I made earrings that almost reach the shoulders. They give you the spooky gold shivers when they once in a while lightly touch your neck... Chain Earrings by RokRokInc. Picture of the house by Markus Jokela/HS.
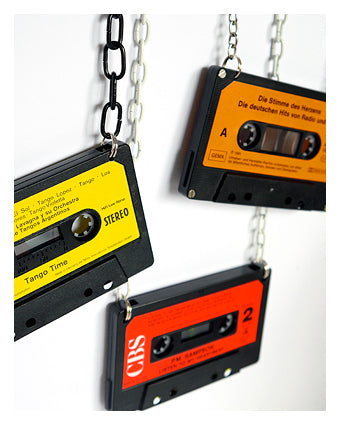
Cassette tape pendant
Cassette tape pendant is very simple to make. You just have to find a tape that you like!
 For tape pendant you need 1 cm split rings, 2 pliers,a drill, 2-3 cm drill bits, (spray paint) and chain.
HOW TO MAKE A CASSETTE TAPE PENDANT
- Drill 2-3 mm holes to the tape both corners but not quite to the edge so that the chain will hang straight. I make the holes about there where there are the holes already.
- Put in 1 cm split rings. Split rings in order to make it last better.
- Add the chain. I like to use a bit chunky chain to balance the heavy pendant.
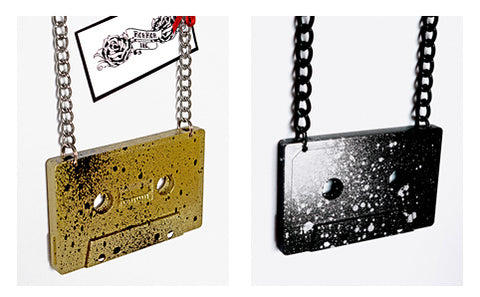 Making spray painted tape will take the whole day because you need to let the paint get dry between layers.
IF YOU'D LIKE TO PAINT THE TAPE
- Choose a cassette. It has to be just plastic without any paper.
- Drill the holes and insert the split rings.
- (Already now because you don't want to mess the paint later.)
- Clean the cassette.
- Spray both sides with plastic primer and let dry.
- Spray both sides 5-10 layers of color (depending how thick layers you make). Let dry at least 30 minutes between the layers. (I have used again the rim spray paint with little sparkles, because it gives a nice finish and is most wear resistant.)
- Spray both sides with paint protection spray and let dry.
- Add the chain.